扫码一下
查看教程更方便
spring boot 为创建数据库的 datasource 提供了很好的支持。 我们不需要编写任何额外的代码来在 spring boot 中创建数据源。 只需添加依赖项并进行配置细节就足以创建数据源并连接数据库。
在本章中,我们将使用 spring boot jdbc 驱动连接来连接数据库。
首先,我们需要在构建配置文件中添加 spring boot starter jdbc 依赖项。
maven 用户可以在 pom.xml 文件中添加以下依赖项。
   org.springframework.boot
   spring-boot-starter-jdbc
gradle 用户可以在 build.gradle 文件中添加以下依赖项。
compile('org.springframework.boot:spring-boot-starter-jdbc')
要连接 h2 数据库,我们需要在构建配置文件中添加 h2 数据库依赖项。
对于 maven 用户,在 pom.xml 文件中添加以下依赖项。
   com.h2database
   h2
对于 gradle 用户,在 build.gradle 文件中添加以下依赖项。
compile('com.h2database:h2')
我们需要在classpath src/main/resources 目录下创建 schema.sql 文件和 data.sql 文件来连接h2数据库。
schema.sqlcreate table product (id int primary key, product_name varchar(25));
data.sqlinsert into product (id,product_name) values (1,'honey'); insert into product (id,product_name) values (2,'almond');
要连接 mysql 数据库,我们需要将 mysql 依赖项添加到我们的构建配置文件中。
对于 maven 用户,在 pom.xml 文件中添加以下依赖项。
   mysql
   mysql-connector-java
对于 gradle 用户,在 build.gradle 文件中添加以下依赖项。
compile('mysql:mysql-connector-java')
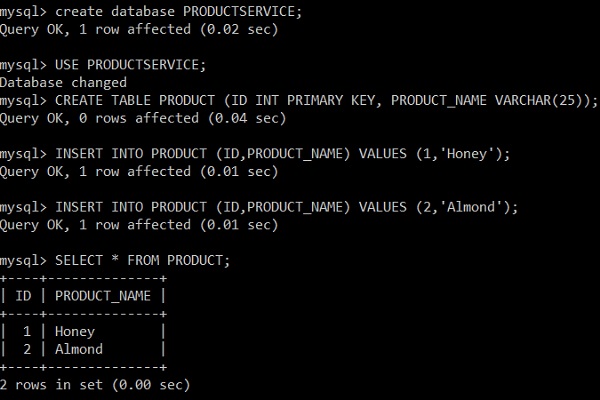
现在,在 mysql 中创建数据库和表,如图所示
对于属性文件用户,在 application.properties 文件中添加以下属性。
spring.datasource.driverclassname = com.mysql.jdbc.driver
spring.datasource.url = jdbc:mysql://localhost:3306/productservice?autoreconnect = true
spring.datasource.username = root
spring.datasource.password = root
spring.datasource.testonborrow = true
spring.datasource.testwhileidle = true
spring.datasource.timebetweenevictionrunsmillis = 60000
spring.datasource.minevictableidletimemillis = 30000
spring.datasource.validationquery = select 1
spring.datasource.max-active = 15
spring.datasource.max-idle = 10
spring.datasource.max-wait = 8000
对于 yaml 用户,在 application.yml 文件中添加以下属性。
spring:
   datasource:
      driverclassname: com.mysql.jdbc.driver
      url: "jdbc:mysql://localhost:3306/productservice?autoreconnect=true"
      username: "root"
      password: "root"
      testonborrow: true
      testwhileidle: true
      timebetweenevictionrunsmillis: 60000
      minevictableidletimemillis: 30000
      validationquery: select 1
      max-active: 15
      max-idle: 10
      max-wait: 8000
redis 是一个开源数据库,用于存储内存中的数据结构。 要在 spring boot 应用程序中连接 redis 数据库,我们需要在构建配置文件中添加 redis 依赖项。
maven 用户应在您的 pom.xml 文件中添加以下依赖项。
   org.springframework.boot
   spring-boot-starter-redis
gradle 用户应在 build.gradle 文件中添加以下依赖项。
compile('org.springframework.boot:spring-boot-starter-data-redis')
对于 redis 连接,我们需要使用 redistemplate。 对于 redistemplate,我们需要提供 jedisconnectionfactory 详细信息。
@bean
jedisconnectionfactory jedisconnectionfactory() {
   jedisconnectionfactory jedisconfactory = new jedisconnectionfactory();
   jedisconfactory.sethostname("localhost");
   jedisconfactory.setport(6000);
   jedisconfactory.setusepool(true);
   return jedisconfactory;
}
@bean
public redistemplate redistemplate() {
   redistemplate template = new redistemplate<>();
   template.setconnectionfactory(jedisconnectionfactory());
   template.setkeyserializer(new stringredisserializer());
   template.sethashkeyserializer(new stringredisserializer());
   template.sethashvalueserializer(new stringredisserializer());
   template.setvalueserializer(new stringredisserializer());
   return template;
}
现在自动连接 redistemplate 类并访问 redis 数据库中的数据。
@autowired
redistemplate redis;
map datalist = redis.opsforhash().entries(“redis_code_index_key”);
要在 spring boot 应用程序中使用 jdbctemplate 访问关系数据库,我们需要在构建配置文件中添加 spring boot starter jdbc 依赖项。
然后,如果你 @autowired jdbctemplate 类,spring boot 会自动连接数据库并为 jdbctemplate 对象设置数据源。
@autowired
jdbctemplate jdbctemplate;
collection> rows = jdbc.queryforlist("select query");
@repository 注释应该添加到类文件中。 @repository 注解用于为 spring boot 应用程序创建数据库存储库。
@repository
public class productservicedao {
}
我们可以在单个 spring boot 应用程序中保留“n”个数据源。 此处给出的示例展示了如何在 spring boot 应用程序中创建多个数据源。 现在,在应用程序属性文件中添加两个数据源配置详细信息。
对于属性文件用户,将以下属性添加到 application.properties 文件中。
spring.dbproductservice.driverclassname = com.mysql.jdbc.driver
spring.dbproductservice.url = jdbc:mysql://localhost:3306/productservice?autoreconnect = true
spring.dbproductservice.username = root
spring.dbproductservice.password = root
spring.dbproductservice.testonborrow = true
spring.dbproductservice.testwhileidle = true
spring.dbproductservice.timebetweenevictionrunsmillis = 60000
spring.dbproductservice.minevictableidletimemillis = 30000
spring.dbproductservice.validationquery = select 1
spring.dbproductservice.max-active = 15
spring.dbproductservice.max-idle = 10
spring.dbproductservice.max-wait = 8000
spring.dbuserservice.driverclassname = com.mysql.jdbc.driver
spring.dbuserservice.url = jdbc:mysql://localhost:3306/userservice?autoreconnect = true
spring.dbuserservice.username = root
spring.dbuserservice.password = root
spring.dbuserservice.testonborrow = true
spring.dbuserservice.testwhileidle = true
spring.dbuserservice.timebetweenevictionrunsmillis = 60000
spring.dbuserservice.minevictableidletimemillis = 30000
spring.dbuserservice.validationquery = select 1
spring.dbuserservice.max-active = 15
spring.dbuserservice.max-idle = 10
spring.dbuserservice.max-wait = 8000
yaml 用户应在 application.yml 文件中添加以下属性。
spring:
   dbproductservice:
      driverclassname: com.mysql.jdbc.driver
      url: "jdbc:mysql://localhost:3306/productservice?autoreconnect=true"
      password: "root"
      username: "root"
      testonborrow: true
      testwhileidle: true
      timebetweenevictionrunsmillis: 60000
      minevictableidletimemillis: 30000
      validationquery: select 1
      max-active: 15
      max-idle: 10
      max-wait: 8000
   dbuserservice:
      driverclassname: com.mysql.jdbc.driver
      url: "jdbc:mysql://localhost:3306/userservice?autoreconnect=true"
      password: "root"
      username: "root"
      testonborrow: true
      testwhileidle: true
      timebetweenevictionrunsmillis: 60000
      minevictableidletimemillis: 30000
      validationquery: select 1
      max-active: 15
      max-idle: 10
      max-wait: 8000
现在,创建一个 configuration 类来为多个数据源创建一个 datasource 和 jdbctemplate。
import javax.sql.datasource;
import org.springframework.beans.factory.annotation.autowired;
import org.springframework.beans.factory.annotation.qualifier;
import org.springframework.boot.autoconfigure.jdbc.datasourcebuilder;
import org.springframework.boot.context.properties.configurationproperties;
import org.springframework.context.annotation.bean;
import org.springframework.context.annotation.configuration;
import org.springframework.context.annotation.primary;
import org.springframework.jdbc.core.jdbctemplate;
@configuration
public class databaseconfig {
   @bean(name = "dbproductservice")
   @configurationproperties(prefix = "spring.dbproductservice")
   @primary
   public datasource createproductservicedatasource() {
      return datasourcebuilder.create().build();
   }
   @bean(name = "dbuserservice")
   @configurationproperties(prefix = "spring.dbuserservice")
   public datasource createuserservicedatasource() {
      return datasourcebuilder.create().build();
   }
   @bean(name = "jdbcproductservice")
   @autowired
   public jdbctemplate createjdbctemplate_productservice(@qualifier("dbproductservice") datasource productserviceds) {
      return new jdbctemplate(productserviceds);
   }
   @bean(name = "jdbcuserservice")
   @autowired
   public jdbctemplate createjdbctemplate_userservice(@qualifier("dbuserservice") datasource userserviceds) {
      return new jdbctemplate(userserviceds);
   }
}
然后,使用 @qualifier 注解自动连接 jdbctemplate 对象。
@qualifier("jdbcproductservice")
@autowired
jdbctemplate jdbctemplate;
@qualifier("jdbcuserservice")
@autowired
jdbctemplate jdbctemplate;
